Fishing is only as effective as the tools that you take with you. You have to account for every scenario possible where things might require modification, especially in emergency cases. One of these cases could be a loosened knot. Below is a list of the best 15 easy fishing knots that you need to know.
1. The Palomar Knot:

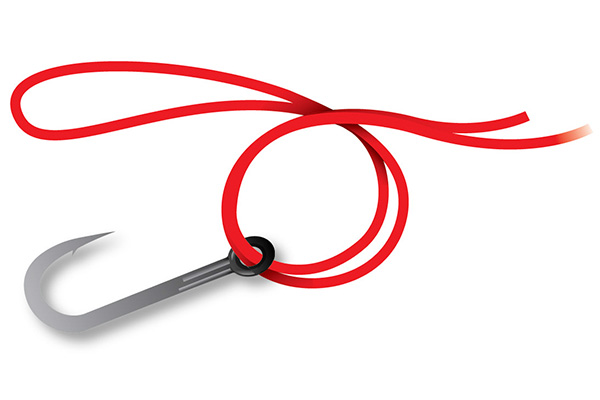
The initial step is to double your line and make sure that you pass it through the split ring or the eye of the hook.

The next step is to tie a simple “over the hand knot,” making sure that the looped end is around the mainline.
In the next step, you can flip the loop up and over the mainline, or you can pass the loop over the line and make sure to tag the end.
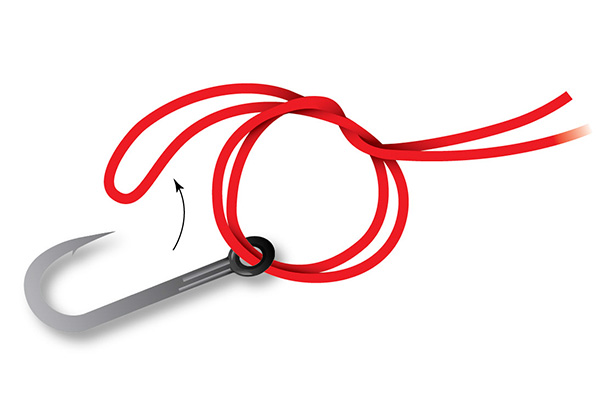
The final step is to wet the line with either water or saliva and pull the tag end slowly until you end up with a neat knot.
2. The Improved Clinch Knot:
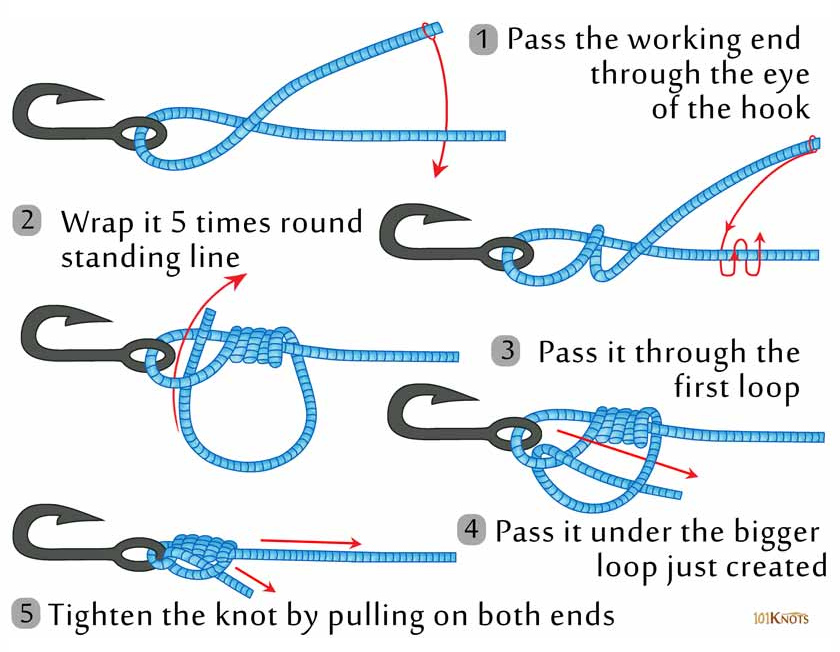
This knot is the simplest to tie and has been considered one of the strongest knots.
The first step is to pass the line through the lure or the eye of the hook. The next step is to wrap the tag end of the line about seven times. Pass the tag end through the opening formed under the first wrap that is close to the eye of the hook and passes it back up through the loop that is formed as shown below. Wet the line and pull the tag end to tighten the knot.
3. The Trilene Knot
Trilene Knot has some similarities with the improved clinch. First, you have to pass the tag end through the eye of the hook, then make a small loop and pass the tag end through that loop again. Next, wrap the tag end through the line five times as shown below.

The final step is to pass the tag end through the double loop that was at the initial stage. Moisten the line and pull the tag end to tighten as shown below.
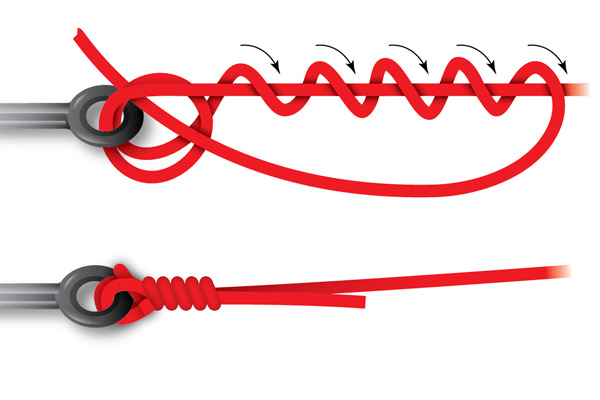
4. The Uni Slip Knot:
Though completely overlooked, this is one of the most powerful knots in bass fishing. Many professional anglers prefer this knot to others.
The first step is to pass the tag end through the eye and run it parallel to the mainline. Loop it downwards towards the eye to create a loop.
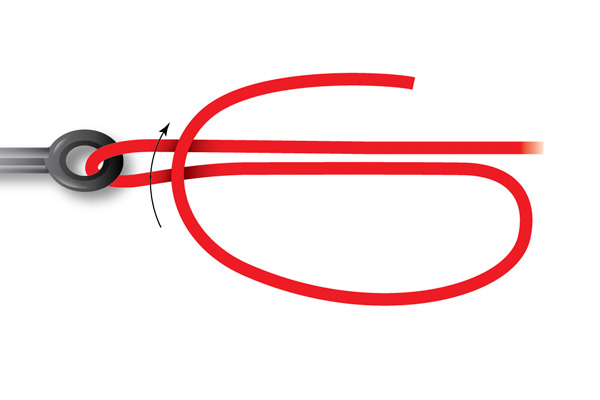
Next wrap the tag end inside the loop you created upwards about five times.
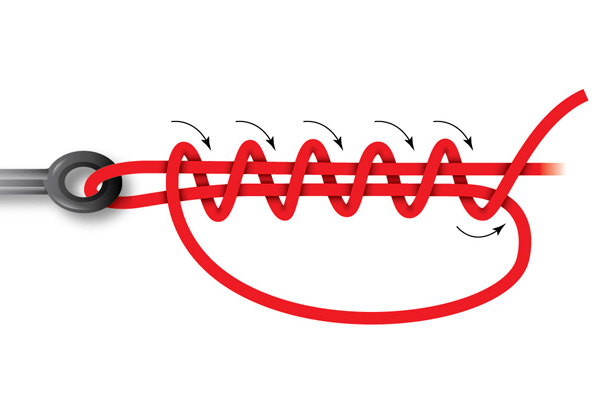
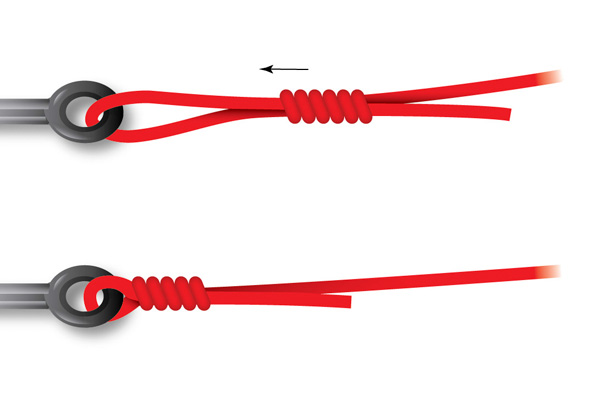
Pull the tag end to tighten the knot and then pull the mainline to work the knot towards the eye of the hook. Make sure that the mainline is wet when pushing the knot towards the eyelet. The following figure shows this process.
5. The San Diego Jam Knot:
This knot is sometimes confused with the Uni Slip Knot as they both wrap around a double line. However, there is a small variation when preparing the two.
The first step is to pass the tag line through the eyelet and run it parallel with the mainline. Make a small loop and start wrapping the tag end around the double lines towards the eye of the hook. After making around seven wraps, pass the tag end through the loop that you created at the top of the knot before you began to wrap it. Moisten the line and pull the tag end to tighten the knot. Pull both the mainline and the tag end to move the knot towards the eyelet as shown below.

6. The Uni Snell Knot:
This knot gained popularity a decade ago when anglers discovered its effectiveness.
Ensure that the hook is facing upwards and pass the line down the eye of the hook using the same side the hook point is facing. Make sure that you run the line down the shank and make a back curl to create a loop like the one found in the uni knot. Wrap your tag end inside the loop around the parallel line and the shank. Make at least five wraps and then gently pull the mainline to tighten the knot.

7. The Rapala Loop Knot:
First tie a half knot that is roughly about three inches away from the tag end. Pass the tag end through the eye of the hook then pass it through the half hitch that you created at the beginning.

Wrap the line at least five times and then pass the tag end again but backward through the half hitch. Wet the line and gently secure the half hitch and the loops together to come up with a knot.

8. The Eugene Slip Knot
First, begin by passing the tag end through the eye of the hook and running it parallel to the mainline. Double back the tag end to make a big loop the use the double-lined loop to wrap the mainline at least five times.

Finally, pass the tag end through the loop located at the top of the knot and ensure that the tag line is directly above the wraps. Wet the line and pull the tag end to tighten the knot. Pull both the mainline and the tag together and then the mainline alone to tighten the knot.
9. The Alberto Knot:
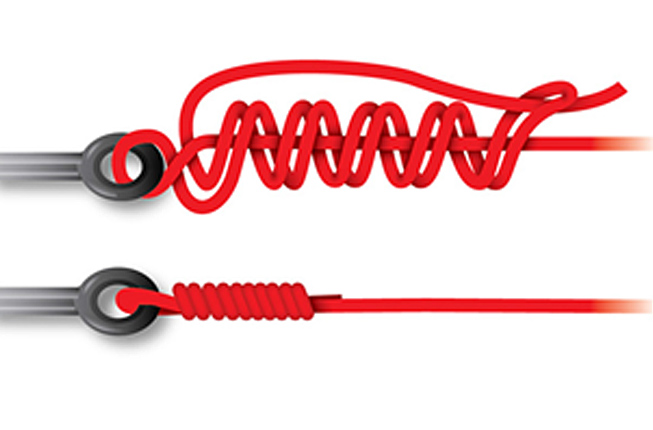
Double the fluorocarbon line and pinch it between your hand. Using the braided line, pass it through the loop of the fluorocarbon that is pinched between your fingers. Wrap the tag end of the braided line around the double lines of the fluorocarbon. Make around eight wraps downwards and at least ten wraps upwards. Ensure that both ends of the braid line’s tag end come out of the fluorocarbon loop in the same direction.
Hold the mainline and the tag end of the braided line in one hand and do the same of the fluorocarbon on the other hand. Pull gently until the knot cinches. Pull both mainlines to secure the knot.

10. The Two-Uni Joint Knot:

To successfully come up with this knot, start by overlapping the tag ends if the fluorocarbon and braid several inches. Loop the braided line then wrap the line at least four times inside the loop to tie a simple uni knot.
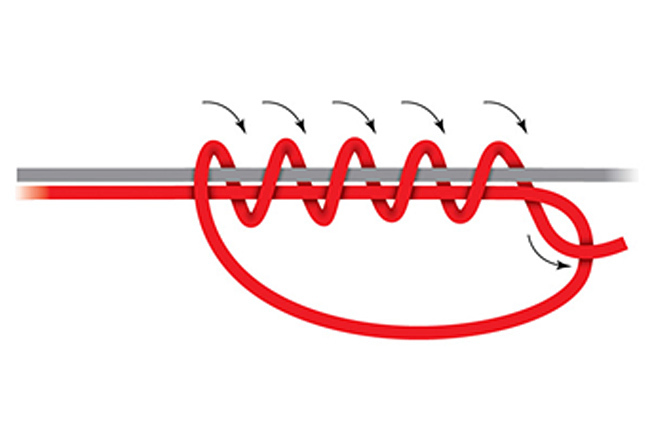
Pull the tag end of the braided line and repeat the same process with the fluorocarbon.
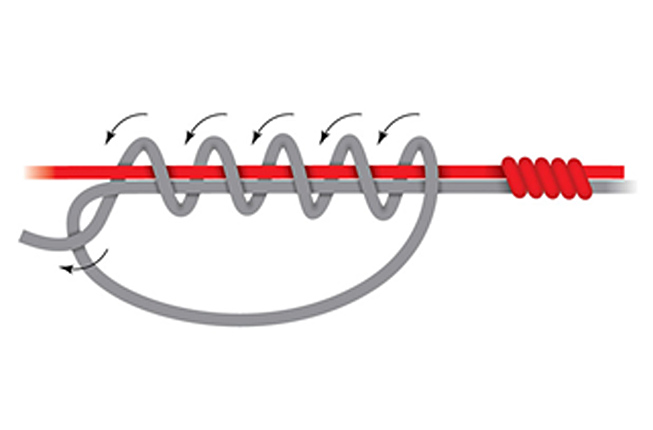
Once you have both knots ready, pull both the tag ends to snug the knot down. Pull both mainlines to slide the knots close to each other.
11. The Yucatan Knot:
First, double over your braid line and wrap it around the fluorocarbon line at least six times. Pass the tag end of the fluorocarbon through the loop and ensure it also passes at the end of the wraps. Wet the lines and pull tag ends and main lines of both lines to snug the knot. The knot is incredibly strong and easy to tie.

12. The J-Knot:
The first step is to place both lines parallel to each other. Holding both lines, make a simple “overhand knot.” Complete the knot by pulling the entire leader through.

Grab the tag end of your mainline and the entire leader to overlap them back into the half hitch once more.

The final step is to loop the tag end and the leader through the knot again and pull them through the knot. Wet both lines and pull them simultaneously so as to cinch the knot.
13. The Double-Line Uni Knot:
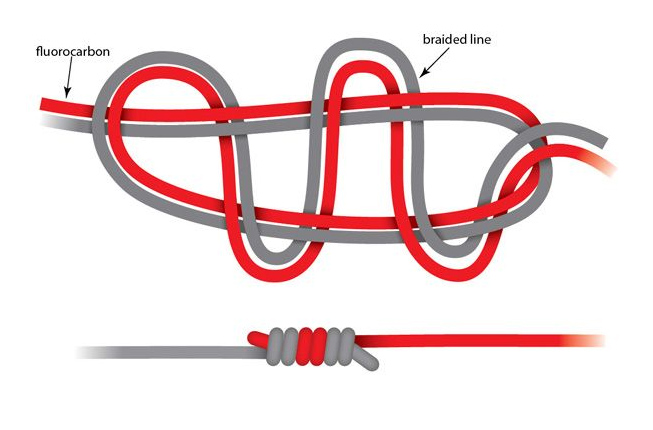
Start by doubling the line and keep it organized in a way that you will be able to pass through the loop.
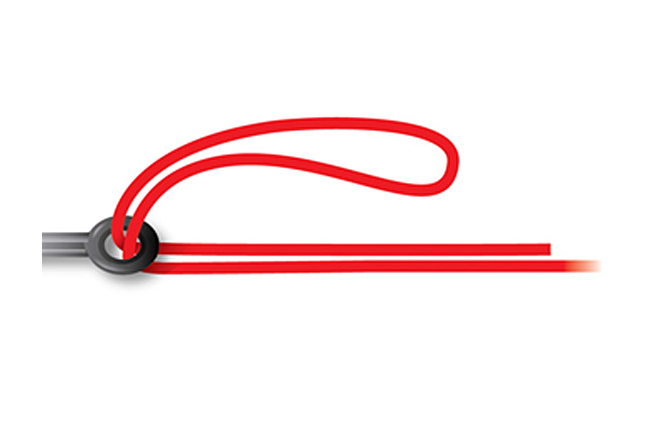
Pass the line through the eyelet. Bring the line several inches up the mainline and loop it back only this time downwards.

Grab the doubled tag ends and doubled sets of lines separately to make it easy to wrap around the loop that was created. Loop around four to seven times and bring out the line towards the top of the mainline.

Wet the lines and tighten them by the loop first, then followed by the mainline and the tag end to slide the wraps towards the eyelet. To tighten the wraps, pull the loop, and the tag ends simultaneously. Finally, pull the main line to tighten the knot.

14. Double Line San Diego Jam Knot:
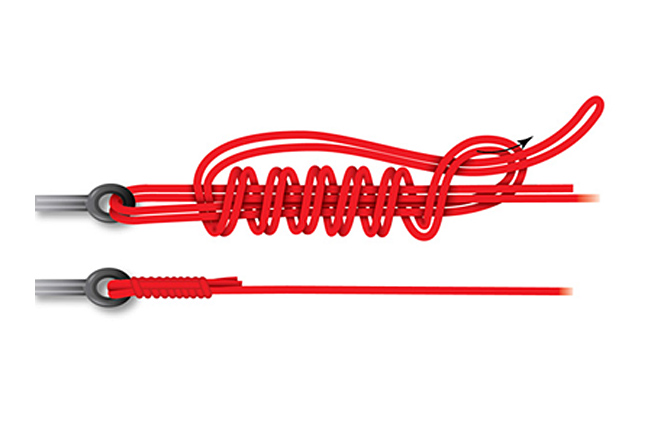
The process is as easy as it can get. Begin by doubling the line and passing it through the eyelet. Make sure to leave some inches of the doubled line on both sides of the knot. Place the doubled main line, and the doubled tag end parallel to each other and pinch it together about two inches above the hook’s eye.
Wrap around the four lines at least seven times. When you reach the bottom, make sure that the doubled line passes between the two doubled lines that are located at the bottom.

Pass the tag end through the loop that was created when you began the process. Moisten the lines and pull the mainline, tag end, and the loop together to tighten the knot.
15. The Arbor Knot:
The first step is to wrap the line around the spool followed by another half a hitch tie around the mainline. Make sure that the tag end does the half hitch tie, and the mainline is only passing through.
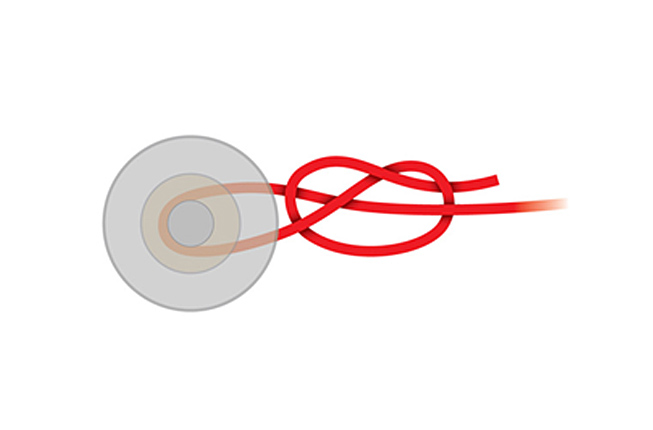
Make another half hitch tie at the end of the line as shown below;

Next, make sure that you pull the half hitch around the mainline, and it’s tight to allow you to slide it down on the sloop.
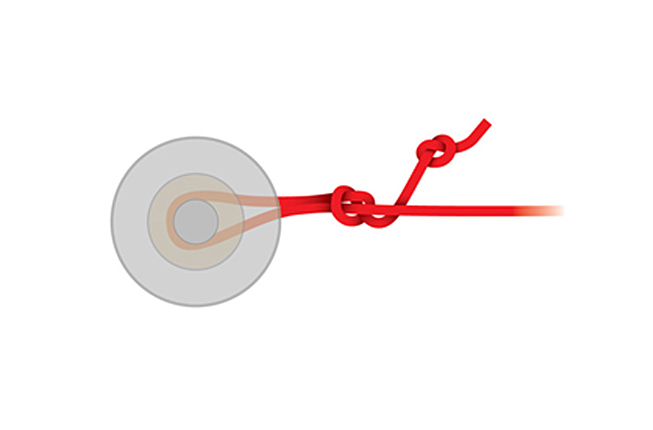
Finally, pull the mainline gently until the half hitch jams up with the other half hitch at the end of the line.

Knowing how to tie a great knot can come in handy when you are bass fishing. These are the best knots you should be aware of. Liked our effort? Please share this article with your friends.

